VoidExpanse/mod uploader: Difference between revisions
Silberspeer (talk | contribs) No edit summary |
Ai enabled (talk | contribs) |
||
| (8 intermediate revisions by 3 users not shown) | |||
| Line 1: | Line 1: | ||
'''Please note that the Mod Uploader tool is currently available only for Windows.''' | |||
== Find the Mod Uploader tool on Steam == | == Find the Mod Uploader tool on Steam == | ||
Find the VoidExpanse Mod Uploader Tool in the Tools section of the Steam ('''Windows'''-only!). To find it easily, hover over Library tab in the Steam client and when drop-down menu appears, choose Tools. | |||
Find VoidExpanse | |||
[[File:VoidExpanse_Mod_Uploader1.png|400px]] | [[File:VoidExpanse_Mod_Uploader1.png|400px]] | ||
== Install the tool == | == Install the tool == | ||
Installation process is the same as when you install games. You need to press Right Mouse Button at VoidExpanse Mods Uploader title and choose "Install game" in the following context menu. It's not a game, of course, but Steam uses the same UI, so be it. Confirm the following standard installation window. Wait until installation is complete. | |||
Installation process is the same as when you install games. You need to press | |||
[[File:VoidExpanse_Mod_Uploader2.png|400px]] | [[File:VoidExpanse_Mod_Uploader2.png|400px]] | ||
== Run the tool == | == Run the tool == | ||
To do so you need to go to the Tools section again (if you left it already) through Library drop-down menu on Steam. After running it it reveals a window with a slot in it and an instruction to drag-and-drop your mod file there. | |||
To do so | |||
[[File:VoidExpanse_Mod_Uploader3.png|400px]] | [[File:VoidExpanse_Mod_Uploader3.png|400px]] | ||
== Load the | == Load the mod into the tool == | ||
Drag-and-drop your mod file (.mpk) OR the whole mod folder to the slot (If you don't know where .mpk file is just search it in your file browser). After dragΓÇöand-dropping the file/folder onto the window the mod details window will appear. For this image we used an existing French localization mod by Targus as an example: | |||
Drag-and-drop your mod file (.mpk) to the slot | |||
[[File:VoidExpanse_Mod_Uploader4.png|400px]] | [[File:VoidExpanse_Mod_Uploader4.png|400px]] | ||
== Editing the mod information == | == Editing the mod information == | ||
Look at the top-left part of the screen. There is "What do you want?" combo box where you can choose either to update existing mod or to create the new one at the upper-left part of the screen. Place a tick at the ΓÇ£Add new modΓÇ¥ position if you are adding a new mod or at ΓÇ£Update an existing modΓÇ¥ if you are doing some updates in your previously created mod. | |||
Look at the top-left part of the screen. There is "What do you want?" | |||
Fill all descriptions fields: | Fill all descriptions fields: | ||
* '''ID:''' Here you need to place the unique mod ID. This ID is needed to distinguish your mod so it's probably better not to use some really complicated names. | |||
* '''Title:''' Here you need to place a title for your mod. This is the title which will be displayed everywhere on Steam. | |||
* '''Author:''' The name of the author of the mod needs to be placed here. | |||
* '''Description:''' Please give brief and easy to understand description of the main ideas and features of your mod here. | |||
* '''Version:''' The current version of the mod. | |||
* '''Min game version:''' The minimal version of the game required for correct mod running. Checkbox below needs to be checked if mod is required to load savegame created with this mod. | |||
* '''Mod type drop-down menu''' below needs you to choose what type of the mod it will be. | |||
* '''Icon:''' Upload an icon for your mod here. To upload an image here you just need to drag-n-drop .jpg or .png image to the target rectangle. | |||
* '''Tags:''' Please select the tags appropriate for your game. | |||
''' | '''Save your mod after editing the description fields by clicking Save button at the bottom of the window.''' | ||
== Uploading your mod to Steam Workshop == | |||
''' | Press Upload button at the bottom of the window. It will open dialog to input the changelog info (add a few words describing your update). Select mod '''Visibility'''. Then press '''Upload''' button to upload the mod to Steam Workshop. Wait until operation completes. | ||
IMPORTANT: after uploading the update to your already existing mod you will need to restart the Steam Client to help it discover and download the update to your mod from Steam Workshop. | |||
{{Modding}} | |||
Latest revision as of 08:16, 10 March 2017
Please note that the Mod Uploader tool is currently available only for Windows.
Find the Mod Uploader tool on Steam
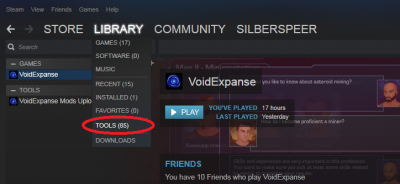
Find the VoidExpanse Mod Uploader Tool in the Tools section of the Steam (Windows-only!). To find it easily, hover over Library tab in the Steam client and when drop-down menu appears, choose Tools.
Install the tool
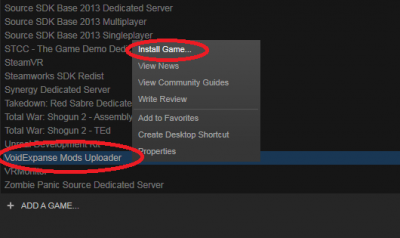
Installation process is the same as when you install games. You need to press Right Mouse Button at VoidExpanse Mods Uploader title and choose "Install game" in the following context menu. It's not a game, of course, but Steam uses the same UI, so be it. Confirm the following standard installation window. Wait until installation is complete.
Run the tool
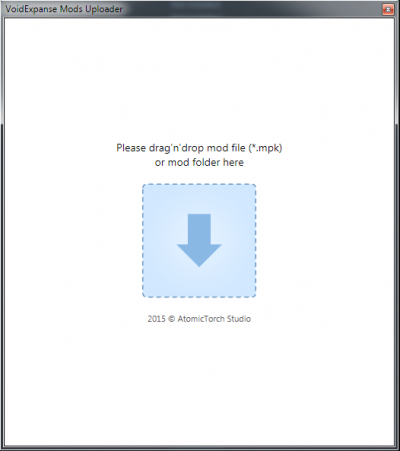
To do so you need to go to the Tools section again (if you left it already) through Library drop-down menu on Steam. After running it it reveals a window with a slot in it and an instruction to drag-and-drop your mod file there.
Load the mod into the tool
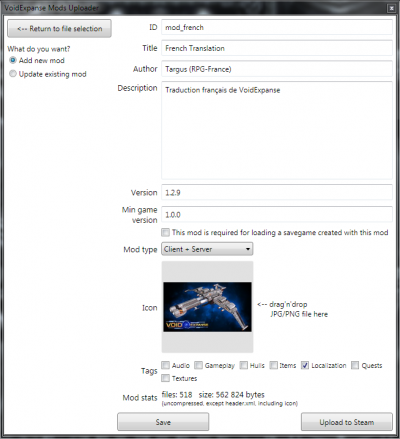
Drag-and-drop your mod file (.mpk) OR the whole mod folder to the slot (If you don't know where .mpk file is just search it in your file browser). After dragΓÇöand-dropping the file/folder onto the window the mod details window will appear. For this image we used an existing French localization mod by Targus as an example:
Editing the mod information
Look at the top-left part of the screen. There is "What do you want?" combo box where you can choose either to update existing mod or to create the new one at the upper-left part of the screen. Place a tick at the ΓÇ£Add new modΓÇ¥ position if you are adding a new mod or at ΓÇ£Update an existing modΓÇ¥ if you are doing some updates in your previously created mod.
Fill all descriptions fields:
- ID: Here you need to place the unique mod ID. This ID is needed to distinguish your mod so it's probably better not to use some really complicated names.
- Title: Here you need to place a title for your mod. This is the title which will be displayed everywhere on Steam.
- Author: The name of the author of the mod needs to be placed here.
- Description: Please give brief and easy to understand description of the main ideas and features of your mod here.
- Version: The current version of the mod.
- Min game version: The minimal version of the game required for correct mod running. Checkbox below needs to be checked if mod is required to load savegame created with this mod.
- Mod type drop-down menu below needs you to choose what type of the mod it will be.
- Icon: Upload an icon for your mod here. To upload an image here you just need to drag-n-drop .jpg or .png image to the target rectangle.
- Tags: Please select the tags appropriate for your game.
Save your mod after editing the description fields by clicking Save button at the bottom of the window.
Uploading your mod to Steam Workshop
Press Upload button at the bottom of the window. It will open dialog to input the changelog info (add a few words describing your update). Select mod Visibility. Then press Upload button to upload the mod to Steam Workshop. Wait until operation completes.
IMPORTANT: after uploading the update to your already existing mod you will need to restart the Steam Client to help it discover and download the update to your mod from Steam Workshop.
| VoidExpanse Modding (Edit template) |
|---|
|
Using mods: Installing and using mods Overview articles: Modding (main article), Package files structure Topic specific articles: Assets modding, Content Modding, Scripting overview, Scripting API, Scripting Events system, Localization Detailed scripting articles: Internal scripts, Global scripts, object scripts, Device scripts, Consumable scripting Tools: VE Physics Adjuster, VE Mod Uploader (Steam), AT Localization Utility |


